Canyon Log
| The canyon log is my chronological account of the various canyon
trips that I have been fortunate enough to partake, and in some cases,
lead.
Sydney is blessed with an abundance of rugged bush land less than two
hours drive away, and in this bush land lie some of the most pristine and
delicate environments that can be found.
Visiting these places may require no more than a simple walk along
a creek, or demand bush craft and navigation skills just to get there.
These trips are 'canyon' trips which involves starting high in the range
and following a creek or stream as it carves it's way down to the river
valley. The Kanangra canyons are generally fairly open and following these
is an exercise in abseiling and scrambling. The beauty of this area is
the panoramic views along the Kanangra Walls and valleys. The incredible
ruggedness of the area.
Blue Mountains canyons like Claustral, cut deep into the sandstone below
them and over time have worn channels and gutters, deep enough that direct
sunlight never reaches the bottom. Walking and swimming through these is
a magical tour through a ferny green wonderland. A visit to the lost planet.
I have kept these notes as a reminder to myself of the individual trips,
as well as to provide 'some' useful information for following excursions,
or to supply to others planning similar outings.
Earlier trips are documented on my original canyons
page, and other trips are indexed on my main canyoning page |
|
As I have been hap-hazardly adding pictures lately, these pages are
best viewed at a screen resolution of 1024 x 768 pixels !
Warning !
This page is incomplete
ButterBox Mt Hap
Sat 7th March 2009
Vert. Elev: 150m (approx.)
Distance : 3km (approx.)
Time : 10 hrs (aprox.)
Comments: Nice hike in. Used the 'real' entrance this time. Good water flow today.
Crew:
Wit Cieslik
Denise 'Sparky' Black
Terry the 'Terrier' Eggington
Linda 'Leg's' Eggington
Equipment:
We found 2 x 50m to be adequate and also used a 25m
All photos courtesy of The Eggs
|

FireFly Canyon Newnes
|
Description
After last weeks resounding success (being Claustral), we immediately planned another outing for today. Butterbox quickly became the
favored choice and the week spent in anticipation of good weather and fine canyoning.
We arrived (almost) on time at Leura and for the first time, had to contend with the changed traffic conditions. Gone is the familiar turn off and Yoda (inside my Tom Tom)
was completely baffled.
A few 'abouts' later and we were on the Mt Hay road heading out to ... Mt Hay. Hooray !
We arrived shortly after the Eggs and found only one other car already at the end of the road. (Two more arrived, but this was merely
to deposit a car shuffle).
With high spirits, liters of sunscreen, 2x50m ropes and a wagon load of food, we set off into the gully to the west. Our rough plan being, seeing as I've never found the right
break in the cliff on the RHS, and subsequently always bashed an entry in, we would instead head to the cliff and move LEFT to explore the possibilities that way.
NOPE!. The cliff edge quickly becomes hanging swamp again, and in deference to diving back into the swampy foliage, we headed back to the good old RHS to peruse
a way in that away !
We found a fixed line going down a suitable slot, but decided to re-live past days and push further on looking for an easier break. (or at least a more familiar one).
There is a good spot just 10-20m further on and low and behold, a faint footpad as well now.
Following the pad only led us back to the base of the 1st break (the one with the hand line) and we could now see why this is the trade route.
A fairly well formed pad descends steeply from here and there was none of the slip-and-slide whoo ha this way, that we had had on earlier trips going in the hard way.
Very soon we reached our first abseil. It's a bit deceptive in terms of length. Initially I though our short rope would do and we could walk (slip and slide) the rest of the way.
After rigging and looking again, I had reservations and called for one of the 50's... This proved to be a much better option, allowing descent not only of the immediate pitch, but
also a secure way past the mini bowl area, and even across the small pool and down the 2m drop beyond that.
20m further on our 2nd drop was found. This time the short rope was plenty.
(was there one more short pitch before we reached the junction?)
The junction was as I remembered it.
Again, done as one pitch with a short drop, a slippery slope, and a slippery overhang, then more slippery slope to the pool.
We took the opportunity to suit up here. Some wades and a short swim quickly brought us to the waterfall. From the ledge on the RHS I scanned the pool below.
Jamieson's original guide suggests abseil, or jump from here.
Subsequent revisions have changed the jump from RHS to 'climb down the waterfall and jump'...
As jumps go, both seem alluring, but neither seemed safe today.
Today we abseil from the RHS. (short rope ok here). I took the opportunity to scan the pool from below (after retrieving my sunnies from the edge of it).
It does look deep and dark, but there is also a large tree trunk taking up residence along the length of the pool.
If you do choose to climb down the waterfall and jump, beware! You jumping into the spot where the tree trunk is closest to the surface.
Jumping from the ledge looks a doable thing. But that pesky tree trunk is kind of right where you'd really like to drop in... but it's fairly deep.
Some slippery scrambling gets us down to the long standing and well used log slide into the next area. (The really cool part).
With the log nice and dry, we all simply hugged it 'down' and stepped across the pools to the big boulder at the end.
Two very sturdy ring bolts are visible. From here down is pretty straight forward. The 50m rope is more than adequate to get down to the chock stone ledge.
A hint here, the 1st person down should take care that they can actually walk or swing out onto the chock stone. It is easy to see that nasty things might happen if you missed it
and went too low.
From the chock stone we set up the 2nd 50m rope to go straight down (inside). This is the fun way, and (so far) we've not run into any problem pulling down this way.
The first time we did this canyon, we set up outside the chock stone and did have some rope problems, overcome by three of us heaving from below.
There is an issue to be aware of however, with the 'inside' decision. The 'Bubbling Pool of Certain Death'!.
Directly below the waterfall, is a smooth-sided cylinder of rock, worn by the water action. Without care, the abseiler drops straight into this and will find it very hard to
get back out again. Stay out of this pool at all costs !!
The 2nd pitch is very atmospheric.
Black rock, rushing water and spray, and the canyon walls towering above and disappearing below and 'round the corner.
A small swim, wade, bridge gets us to a short climb down. Again we found (and this time used) a fixed line. The tiny pool here as not very deep and has some ugly boulders
hidden in it. Jumping looks tempting, but is definitely NOT advised.
From the end of this pool however, is a nice safe 2m jump into a good sized pool, complete with sunny rocks and small overgrown beach to warm up again.
The bulk of the canyon is done now, and following the creek takes you back and forth, sometime high above the water, but mostly through it.
Several root climbs are used follow the line of least resistance. Some could be jumped.
We eventually popped out on the LHS of the water fall for the final abseil. (From memory our other trips all came out on the RHS).
An easy rap, careful walk across the slippery base of the falls and time for food and de-suiting.
The first part of the clamber out is just up up UP UP and UP.
A quite easy to follow foot pad leads east (right) around the base of the cliff, up and down, (mostly up) until reaching a small steep and eroded gully.
Here the going is pretty much straight up. For a while ....
Eventually the cliff comes back into view and the track makes a distinct turn back towards the canyon. Undulating it's way into the cliff line.
Although the dusty cave is an option for some belly crawling, it's easier to carefully walk around the edge, needing only to 'get down' for the
last couple of steps.
Immediately around the corner you should find a fixed hanger on the face, and a small comfy ledge for two or three and some belaying.
The climb here is protected with fixed hangers and is really just two very short pitches (15m in total), but with awesome exposure. Watching people from the top, it looks like
they've just climbed up from the base of the cliff 100m or more below. Fantastic !
The top of the climb has a massive ring bolt set into the overhang above. Beware the treacherous scree.
Easy to slip on, and an ever-present danger to those below as well.
The ascending isn't over yet, the path from here disappears around the corner into a steep gully with more vertical scrambling in short bursts.
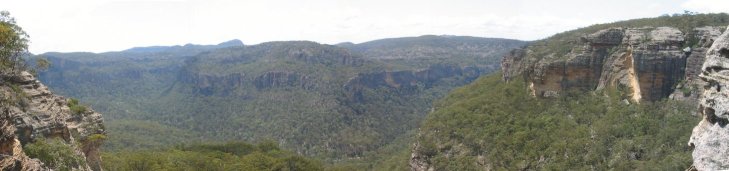
Once up on he ridge top however, the views are well worth the money.
This is one of those areas, where the size of the landscape around you is just astounding !
Gear
We found 2 x 50m ropes and wetsuits adequate for this canyon.
Also 4 x quickdraws and some extra biners and slings for the climb out and pack hauling.
(...)
Our information on this area :
Other Sources of information on this area :
- ** Canyons Near Sydney Ed 3 (Rick Jamieson)
- ** Canyons Near Sydney Ed 4 (Rick Jamieson)
- OzCanyons


EVP Home Page